
NP-RID-Receiver Remote ID Receiver
Overview
The NP-RID-Receiver is a broadcast UAV remote identification receiver from NextPilot, referred to as a RID (Remote ID) receiving device. It meets the requirements of the GB 46750-2025 standard, supports reception and parsing of WiFi beacon frames and Bluetooth broadcast signals, and can receive broadcasts from up to 50 UAVs simultaneously. It connects to supervision software over a USB serial port to satisfy UAV flight supervision requirements.
Key features of the product:
- The serial output data protocol is configurable, supporting MAVLink or JSON format;
- Users can view received UAV identifiers and device operating status from a web page;
- A serial console is provided: users can enter commands with any serial terminal to configure parameters, reboot and monitor task status;
- OTA upgrade is supported — download the latest firmware from the official website and upgrade through the web page;
- Connection is extremely simple: a single USB (Type-C) cable provides power, configuration and data reception.
Purchase link: https://item.taobao.com/item.htm?id=1080770176626&mi_id=0000I6qNljnOrxWQA_s_anzovO7YazA6_WVTqM4mrHshyjM
Video tutorial: NextPilot RID Receiver Module — 01 Product Introduction (bilibili)
Official documentation: Product Manuals | NextPilot
Product Functions
- Receives UAV broadcast data, supporting the new national standard GB 46750-2025;
- Outputs data over a serial port in MAVLink or JSON format;
- Supports ground station display — shows UAV position and status in QGC, NextPilot and Mission Planner;
- Supports OTA upgrade — firmware can be uploaded and upgraded through the web page;
- Supports parameter configuration — parameters can be set quickly over the debug serial port to control device behavior and functions.
Hardware
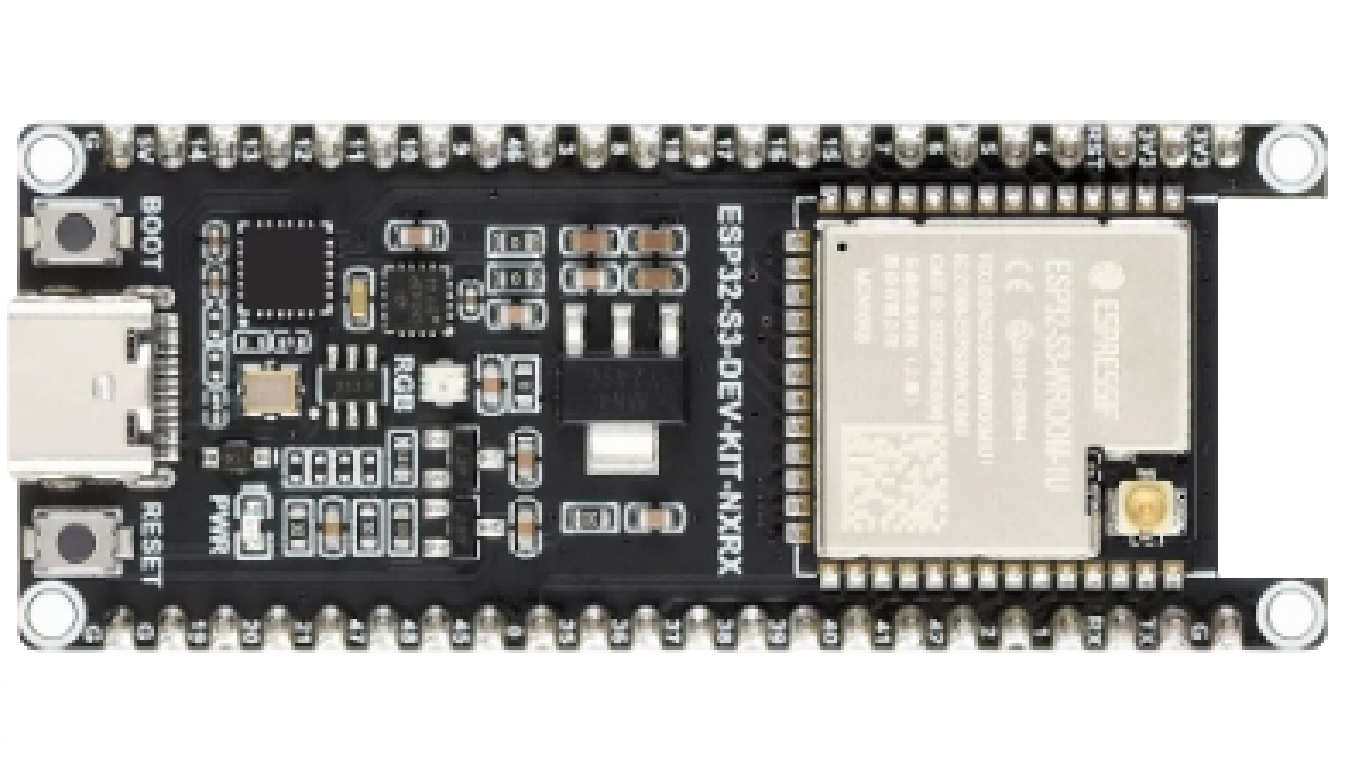
The product hardware is shown below:
Specifications
Technical Specifications
- Main control chip: ESP32-S3;
- Interfaces: 1 USB (including debug serial port and data output serial port), two 22-pin headers (2.54 mm pitch);
- Supported received signal types: WiFi broadcast beacon frames, Bluetooth 5;
- Maximum number of received signals: 50;
- Data processing time: ≤ 20 ms;
- Signal reception dynamic range: ≥ 74 dB;
- Output data format: MAVLink / JSON;
- Dimensions: ≤ 62 mm x 22 mm;
- Weight: ≤ 15 g;
Interface Description
The product mainly provides the following interfaces:
USB: a USB hub expands two serial ports, used to view operating status and configure parameters;
- Debug serial port: baud rate 115200 (not adjustable), outputs device operating status and accepts configuration commands for parameter setting, reboot, etc.;
- Data output serial port: default baud rate 115200 (adjustable), outputs received UAV broadcast information; the output data protocol format (MAVLink or JSON) is determined by the
CFG_PROTOCOLparameter;
Pin headers: two 2.54 mm pitch headers bring out all pins for use as needed.
Quick Start
Viewing Broadcast Data with a Serial Terminal
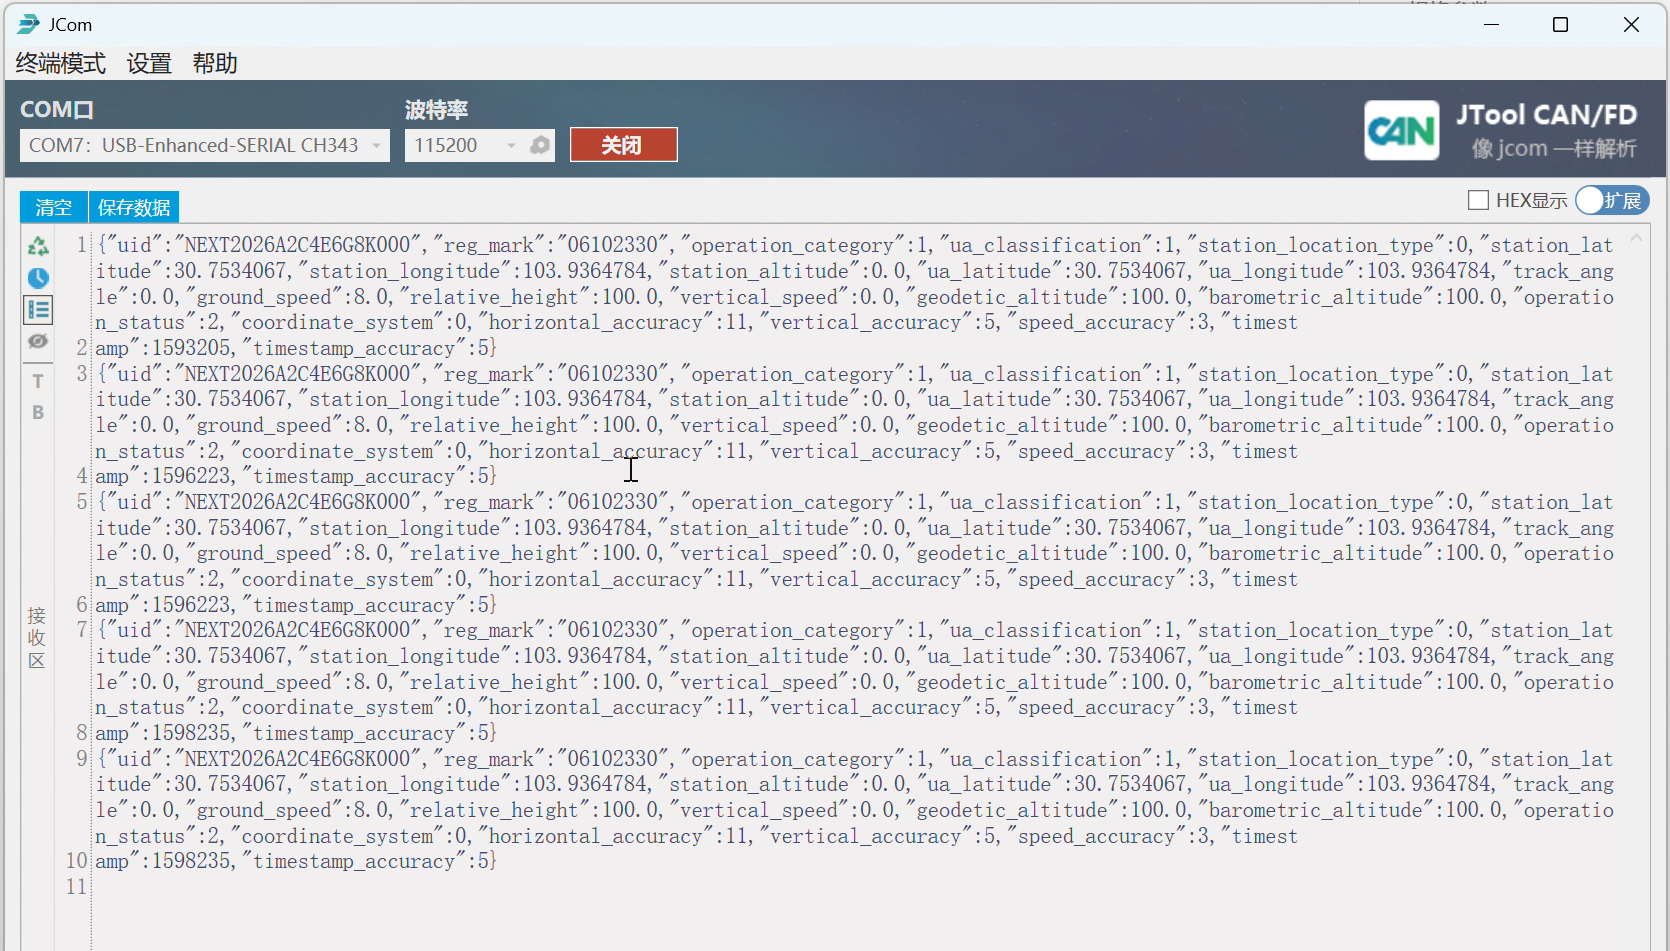
The product outputs JSON data by default. Connect the RID device USB port to a computer and you can view UAV broadcast data directly with a serial terminal.
Displaying Broadcast Data in a Ground Station
Refer to Selecting the Output Protocol to set the serial output to the MAVLink protocol; you can then view the received broadcast data and UAV positions directly in the ground station.
Connecting the Device
Connect the RID device to the computer with a Type-C USB cable. If the serial port is unavailable, check whether the driver is installed. Download the CH343 driver here and test again.
Opening the Ground Station
Open the QGC or Mission Planner ground station, create a serial connection and generally select the second serial port. Once UAV broadcast signals are received successfully, UAV information is displayed automatically in the ground station.
Viewing Data on the Web Page
Connecting the Device
Connect the RID device to the computer with a Type-C USB cable. Once powered over USB, the RID device automatically creates a WiFi hotspot named NP-RID-Receiver with password nextpilot.
Connecting to the Hotspot
Connect to the hotspot with your laptop. The hotspot starts by default at power-on; if it has been disabled, set the parameter WIFI_AP_ENABLE=1 and then reboot.
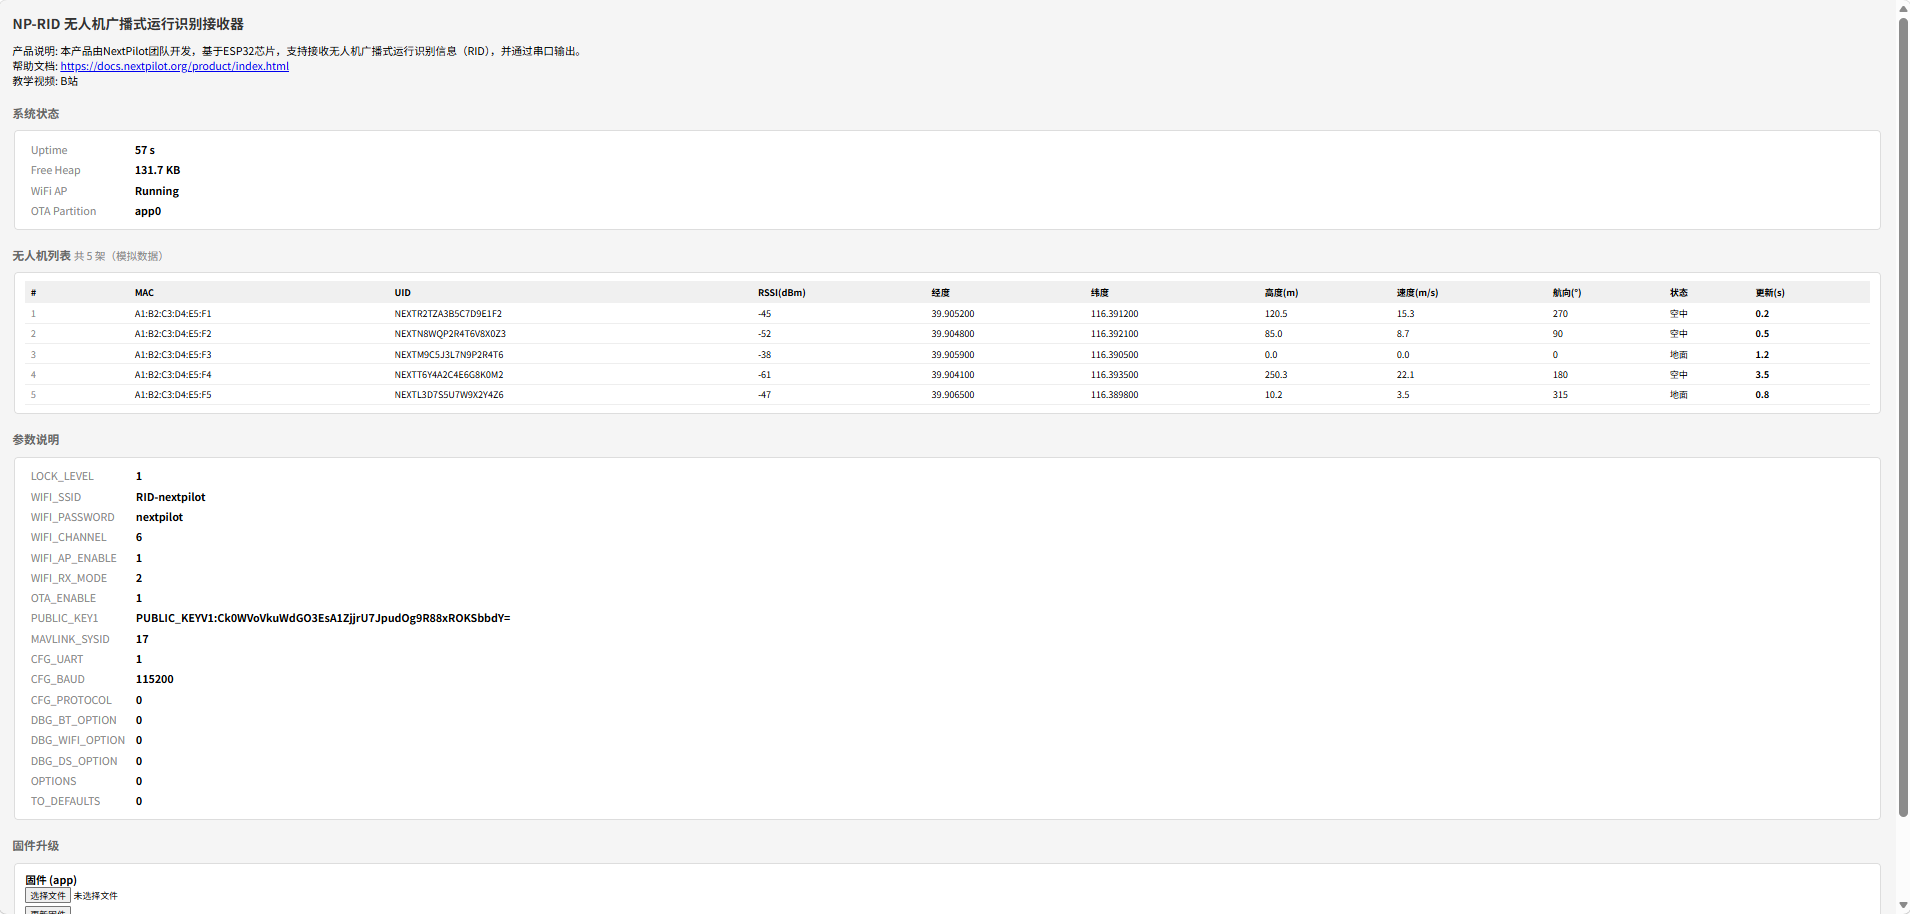
Web Page Description
The web page contains four sections: system status, UAV list, parameter reference and firmware upgrade.
System status: shows information such as the RID device uptime since power-on;
UAV list: shows the UAV information currently received via broadcast;
Parameter reference: shows all current parameters; see Parameter Reference for details;
Firmware upgrade: upgrades both the application and the web page; see OTA Upgrade for details.
Parameter Configuration
Generally the first USB serial port is the debug serial port (also called the console serial port), which is used to interact with the device. Configuring parameters flexibly over the USB serial port controls the device operating logic — selecting the data output serial port, starting the WiFi hotspot, enabling print output — which greatly simplifies testing during use.
Procedure
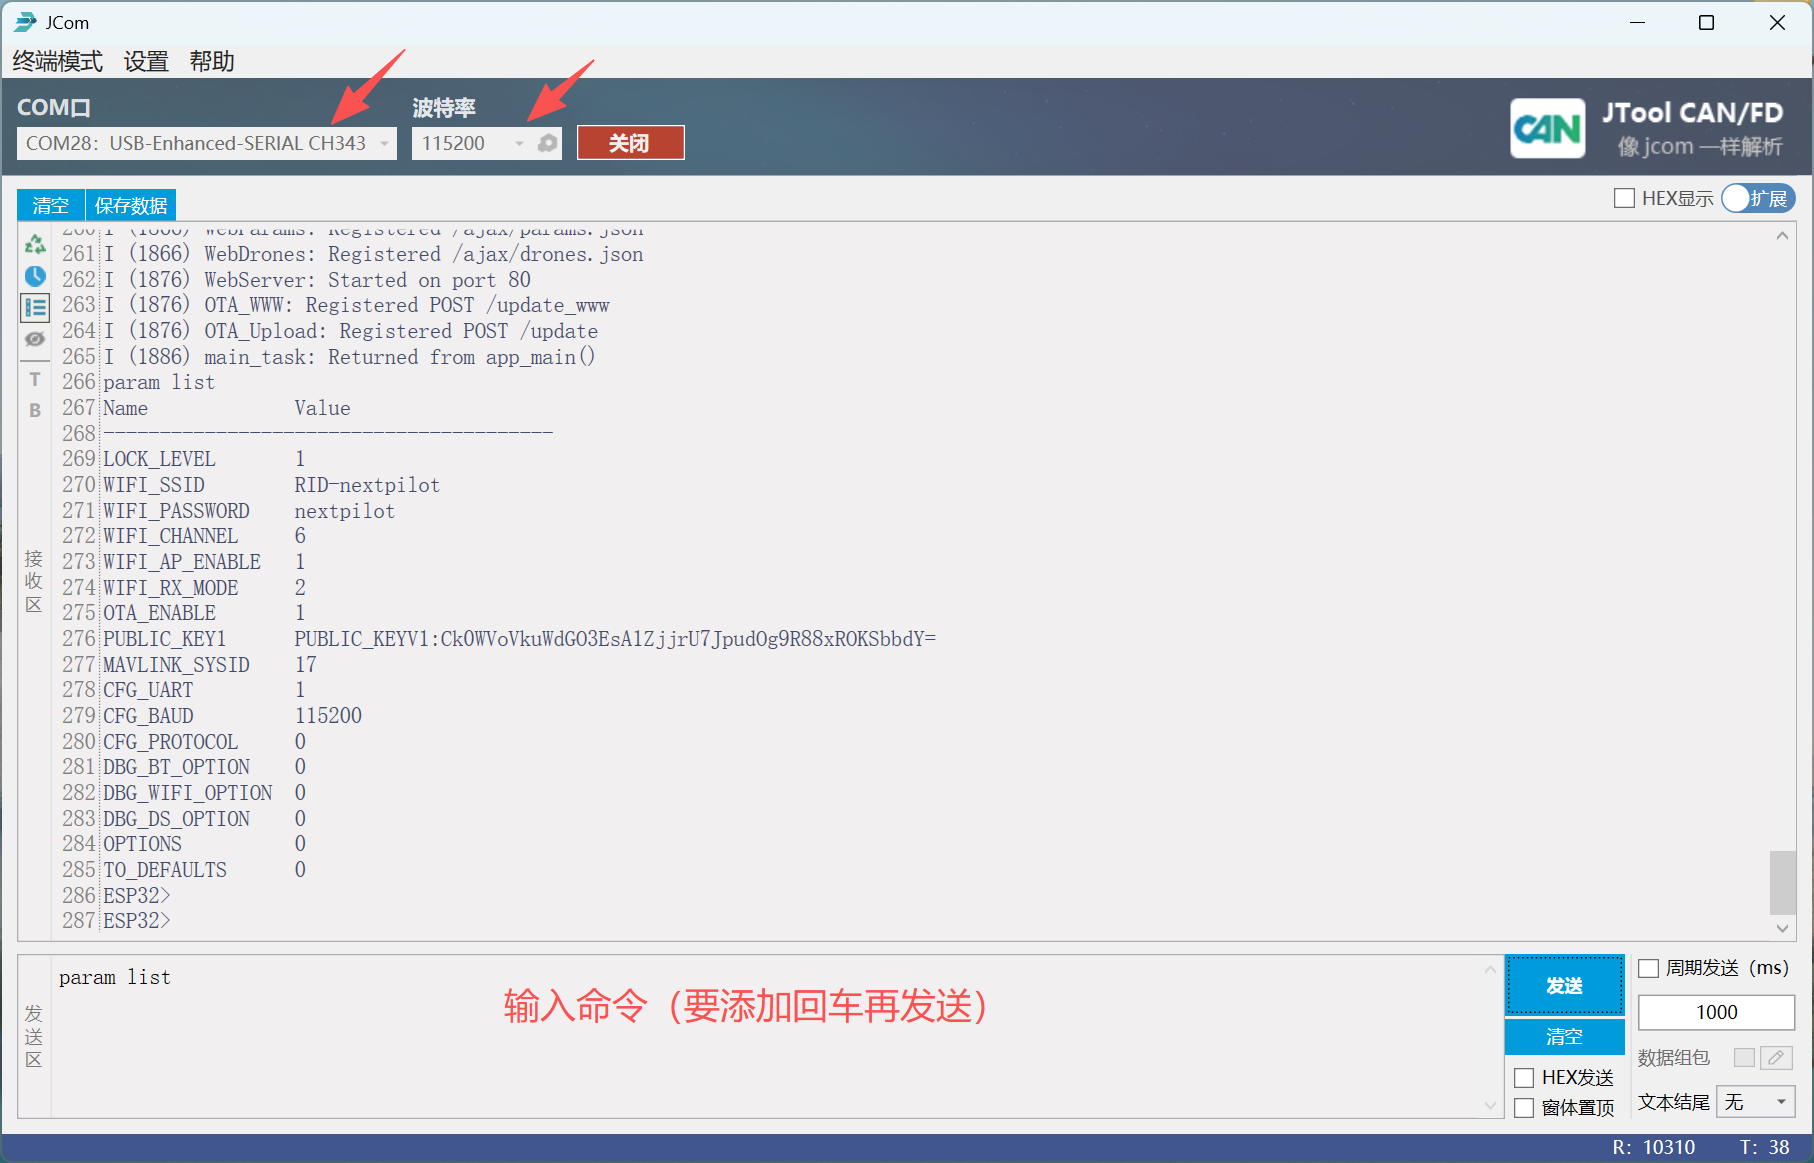
Connect the product USB serial port to the computer with a Type-C cable, open a serial terminal program (such as MobaXterm, JCom, etc.), select the port number and set the baud rate to 115200. Enter the relevant commands in the serial terminal to view parameters, set parameters, reboot the device and so on.
Common Commands
The following command categories are available:
- Help command:
help - Reboot the device:
reboot - Parameter commands: see the table below
| Operation | Command | Example |
|---|---|---|
| List all parameters | param list | List all parameters: param list |
| Reset parameters to defaults | param reset | Reset parameters: param reset |
| Read a specific parameter | param get [name] | Read the data output serial baud rate: param get CFG_BAUD |
| Set a parameter | param set [name] [value] | Disable the WiFi hotspot: param set WIFI_AP_ENABLE 0Set the output protocol to MAVLink: param set CFG_PROTOCOL 1Set baud rate: param set CFG_BAUD 115200 |
WARNING
Note: a carriage return must follow the command for it to take effect!!!
Parameter Reference
All parameters are described in the table below:
| Parameter | Description | Remarks |
|---|---|---|
| WIFI_AP_ENABLE | Enable / disable the WiFi hotspot 0: disabled 1: enabled (default) | When the WiFi hotspot is enabled (AP mode) broadcast data cannot be received over WiFi (Bluetooth reception always works). Enabled by default so users can monitor device status. To receive over WiFi, disable it. |
| CFG_UART | Select the data output serial port 1: UART1 (default) 2: UART2 | Can only be set to 1 or 2 |
| CFG_BAUD | Serial baud rate (default 115200) | |
| CFG_PROTOCOL | Data output protocol format 1: MAVLink, HEARTBEAT, GPS_RAW_INT and OpenDroneID messages 2: JSON (default) | With MAVLink output, connect the RID device to a ground station (PX4, NextPilot, etc.) over USB to show received UAV positions on the map; With JSON output, received UAV data is printed as text in the serial terminal for easy manual inspection. |
| DBG_BT_OPTION | Bluetooth reception debug option 0: do not output debug info over serial (default) 1: print AD Structure info over serial (broadcaster MAC, SID, RSSI, packet length, etc.) | Printed on the debug serial port by default; lets you quickly inspect nearby Bluetooth signal sources |
| DBG_WIFI_OPTION | WiFi reception debug option 0: do not output debug info over serial (default) 1: print Beacon info over serial (broadcaster MAC, RSSI, packet length, etc.) | Printed on the debug serial port by default; lets you quickly inspect nearby WiFi signal sources |
| DBG_DS_OPTION | Received UAV status data debug option 0: do not output debug info over serial (default) 1: print UAV identity info, including unique identifier, real-name registration, operation category, classification and operating status 2: print remote pilot station info 4: print UAV position info, including timestamp, coordinate type, latitude / longitude, track angle, ground speed, relative altitude, geodetic altitude and barometric altitude 8: print accuracy info, including horizontal, vertical, speed and time accuracy | Printed on the debug serial port by default; lets you quickly inspect nearby UAV broadcast information. To show multiple groups at once, add the corresponding numbers, e.g. 3 = 1 + 2 prints UAV identity + remote pilot station info |
Common configurations:
# Disable the WiFi hotspot:
param set WIFI_AP_ENABLE 0
# Enable the WiFi hotspot:
param set WIFI_AP_ENABLE 1
# Set the output protocol to MAVLink
param set CFG_PROTOCOL 1
# Set the output protocol to JSON
param set CFG_PROTOCOL 2
# Set the data output serial baud rate
param set CFG_BAUD 115200Advanced Functions
Enabling WiFi Broadcast Reception
By default the product enables Bluetooth reception and the WiFi hotspot for web viewing and configuration, so WiFi broadcast data cannot be received. To enable WiFi broadcast reception you must first disable the WiFi hotspot.
The relevant operations are:
Disable the WiFi hotspot (WiFi broadcast signals will be received after reboot):
param set WIFI_AP_ENABLE 0Enable the WiFi hotspot (after enabling, status cannot be viewed from the web page):
param set WIFI_AP_ENABLE 1
Selecting the Output Protocol
The following data protocol formats are supported:
MAVLink protocol: converts each received UAV into a corresponding UAV instance, so multiple UAV positions can be shown simultaneously in the ground station. See MAVLink Common Message Set (common.xml) | MAVLink Guide for details; the command is:
bashparam set CFG_PROTOCOL 1JSON format: default, output as a string, highly readable; the command is:
bashparam set CFG_PROTOCOL 2
TIP
Because the Chinese national standard protocol content is not exactly the same as MAVLink, MAVLink message fields have to be borrowed for transmission. A few fields differ, as mapped in the table below:
| Message | Original field | Mapped GB meaning |
|---|---|---|
| OPEN_DRONE_ID_LOCATION (12901) | status | Operating status |
| OPEN_DRONE_ID_BASIC_ID (12900) | uas_id | Last 8 digits of registration number |
| OPEN_DRONE_ID_SYSTEM (12904) | classification_type | UAV classification |
| category_eu | Operation category |
OTA Upgrade
Downloading Firmware
| Board | Current firmware version | Download |
|---|---|---|
| NP-RID-Receiver-S3-PinWX | V1.2 | OTA app firmware OTA web firmware |
Connecting to the Hotspot
After starting the WiFi hotspot, connect to it with your laptop (hotspot name NP-RID-Receiver, password nextpilot). The hotspot starts by default at power-on; if it has been disabled, set the parameter WIFI_AP_ENABLE=1 and then reboot.
Upgrading Firmware
After connecting to the hotspot, enter http://192.168.4.1 in the browser and click "Choose file" under Firmware (app) at the bottom.
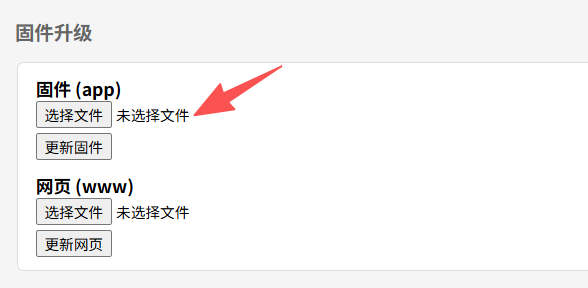
Select the downloaded app.bin firmware in the dialog, then click Update firmware.
The device reboots automatically once the update completes!
Upgrading the Web Page
Click "Choose file" under Web page (www), select the downloaded www.bin file, then click Update web page. Refresh the web page after the update succeeds.
FAQ
- The WiFi hotspot is enabled by default; to disable it, use the parameter (
WIFI_AP_ENABLE=0); - With the WiFi hotspot enabled, external UAV broadcast data can only be received over Bluetooth and WiFi broadcast reception stops;
- To perform an OTA upgrade, make sure the WiFi hotspot is on (
WIFI_AP_ENABLE=1) and OTA is enabled (OTA_ENABLE=1); - If no RID broadcast is received, check the following in order:
- Whether the UAV RID broadcast only supports WiFi — to receive WiFi broadcasts, disable the WiFi hotspot (
param set WIFI_AP_ENABLE 0); - If there is still no RID data, set the debug parameter (
param set DBG_WIFI_OPTION 1) and check the printed information to see whether WiFi broadcast packets are received, such as MAC address, RSSI and packet length;
- Whether the UAV RID broadcast only supports WiFi — to receive WiFi broadcasts, disable the WiFi hotspot (
Changelog
v1.0
Initial version, completing the basic RID reception functions.
v1.2
Fixed abnormal data units.